Welcome to our new article about user registration in PHP. First of all, we will create a basic Bootstrap 5 HTML registration form. Then, we will write PHP code to register a new user on our system and save the record in our database. This article is designed for basic understanding. Complex concepts like server and client-side validation, password hashing, etc are not covered in this article. We will see these concepts in our coming articles.
How to create HTML form?
- Create a new file "register.php". All the Html markup code will be written in this file.
- Include bootstrap 5 in your code because we will use bootstrap 5 classes to design our registration form.
- Inside body tag, use Bootstrap 5 grid system and create a Bootstrap row with only one column.
- Set the width of the column to col-6 out of 12. We know that Bootstrap has 12 template columns per row to create different layouts.
- Create the "register.inc.php" file inside the includes folder for our pure PHP code.
- Inside this column, create a form with the POST method.
- Set its action to the PHP file where you will write your PHP code. In our case, action is set as "includes/register.inc.php". It means we have a file "register.inc.php " inside the "includes" folder.
- Now create five input fields name, phone no, email, password, repeat password inside the form tag.
- Create a submit button to submit the HTML form.
Now see all the above-stated steps in the HTML code example.
<!doctype html>
<html lang="en">
  <head>
    <!-- Required meta tags -->
    <meta charset="utf-8">
    <meta name="viewport" content="width=device-width, initial-scale=1">

    <!-- Bootstrap CSS -->
    <link href="https://cdn.jsdelivr.net/npm/bootstrap@5.0.2/dist/css/bootstrap.min.css" rel="stylesheet" integrity="sha384-EVSTQN3/azprG1Anm3QDgpJLIm9Nao0Yz1ztcQTwFspd3yD65VohhpuuCOmLASjC" crossorigin="anonymous">

    <title>Login</title>
  </head>
  <body>
    <section>

<!-- Bootstrap rows and columns  -->
    <div class="row justify-content-center my-5">

    	<div class="col-6">
    	<!-- create form -->
            <form method="POST" action="includes/register.inc.php">
        <!-- creating input fields inside html form -->
	         <div class="mb-3">
		     <label  class="form-label">Name</label>
	             <input type="text" class="form-control" name="name">
		 </div>
		 <div class="mb-3">
		     <label  class="form-label">Phone no</label>
		     <input type="text" class="form-control" name="phone" >
		 </div>
		 <div class="mb-3">
		     <label  class="form-label">Email address</label>
		     <input type="email" class="form-control" name="email">
		 </div>
		 <div class="mb-3">
		    <label class="form-label">Password</label>
		    <input type="password" class="form-control" name="password" >
		 </div>
		 <div class="mb-3">
		    <label class="form-label">Repeat Password</label>
		    <input type="password" class="form-control" name="re_pass">
		 </div>
		<!-- creating submit button -->
		 <button type="submit" class="btn btn-primary px-5" name="submit">
		  	Submit
		 </button>
	    </form>
        </div>
    </div>
   </section>
    <script src="https://cdn.jsdelivr.net/npm/bootstrap@5.0.2/dist/js/bootstrap.bundle.min.js" integrity="sha384-MrcW6ZMFYlzcLA8Nl+NtUVF0sA7MsXsP1UyJoMp4YLEuNSfAP+JcXn/tWtIaxVXM" crossorigin="anonymous"></script>
  </body>
</html>
Now let's first create a "user" table in our library database.
How to create a table in database using phpmyadmin?
- Open Xamp control panel and run apache and MySQL services.
- Open "localhost/phpmyadmin/" in any browser.
- Click on the name of the database where you want to create your table.
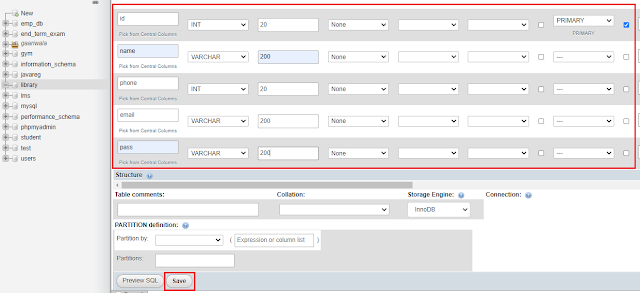
- Give table name and number of columns. In our case, the database name is "user" and the number of columns is 5.
- Name the first column as "id", set its type to int and length to 20. Also, check the auto-increment option for this column. This column is the primary key of our "user" table.
- Name the rest of the four columns in our registration form, like name, email, phone number, and password.
- Click on the Save button to create the "user" table in our library database.
- Click on "new" under the database name to create a table if you already have at least one table.
- That's it your table is created now.
We are done with HTML markup. Now let's start our PHP backend code.
How to register user in PHP?
- Open the "register.inc.php" file to start writing PHP code.
- Include database connectivity file "db.inc.php" using require statement. Read our database connectivity article if you want to know more about the "db.inc.php" file.
- Check if the submit button is pressed using the PHP isset() function.
- Store the received data using the PHP post method into variables. The data is received in $_POST associative array. To access this data, we will use the HTML name attribute.
- Check if password and repeat password are the same.
- Write SQL Insert query to insert the record of the user into the database.
- Execute the insert query using the mysqli_query() function.
- Check if the query is successfully executed.
- If Query is successfully executed, print success message.
- If there is some error, use the PHP die() function to stop the script.
- Use mysqli_error() function to see the description of the generated error.
Now see all these steps in a working PHP code.
<?php
	require "db.inc.php";
	if(isset($_POST['submit'])){

	   $name = $_POST["name"];
	   $phone= $_POST["phone"];
	   $email = $_POST["email"];
	   $pass = $_POST["password"];
	   $re_pass = $_POST["re_pass"];

        if($pass == $re_pass){

	     $query ="INSERT INTO `user`(`name`, `phone`, `email`, `pass`) VALUES ('$name',$phone,'$email','$pass');";

	        if(mysqli_query($conn, $query)){

		   echo "user registered successfully";
		}else{

		   die("error while executing the query". mysqli_error($conn));

		    }
	   }

	}else{
		die("error while submiting the form");
	}
mysqli_close($conn);?>
Let's End this article here. In the next article, we will talk about log-in functionality and sessions in PHP. I hope you enjoyed this article. Keep reading and supporting us.


0 Comments